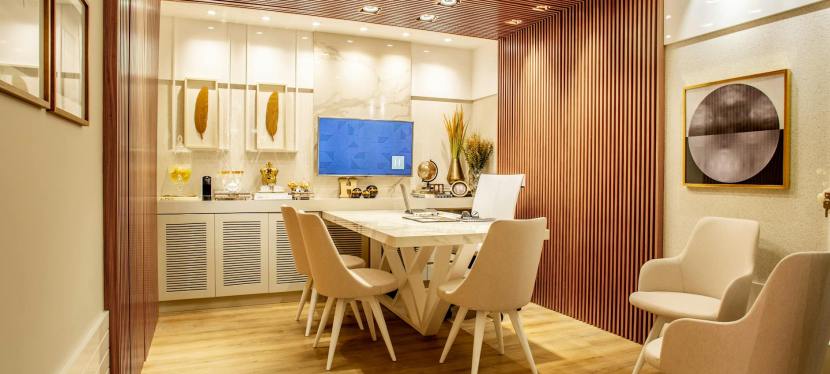
It’s inevitable that homes will need maintenance at some point. By knowing what needs to be done and when you can help minimize the stress and hassle that comes with it. In this article, we will discuss everything you need to know about maintaining your home! We’ll cover topics such as cleaning, repairs, and even landscaping. So whether you’re a new homeowner or have been one for years, read on for helpful tips and advice.
Read moreCategory: house
Tips for a Smooth and Successful Home Renovation
A home renovation is a perfect excuse to make some changes to your house and lifestyle. You can make some preparations to complete these renovations in time without any trouble, and you must put effort into it. Thinking about the result is exciting, and an excellent way to see your vision come true is to follow these tips for a smooth and successful home renovation.
Read moreA Bathroom Renovation Costing Guide From a Professional.
Renovating your bathroom can be expensive. It can involve hiring plumbers and electricians, changing the floor plan, and changing the fixtures. Here are some tips to help you save money on your renovation.
Read more4 Essential Considerations Before Starting Your Next Interior Revamp Project
Are you considering a revamp project for your home but feeling overwhelmed by where to start? Don’t worry, you’re not alone. Every homeowner will go through this process at some point – it’s all part of the adventure! But before you can even begin to think about paint colors and furniture, there are a few key things you need to take into account. This blog post will discuss four essential considerations that will help set the stage for a successful interior revamp project.
Read moreQuick & Easy Ways To Rework Your Home’s Style
Everybody wants their home to be as stylish as possible. While functionality will be a core factor behind all of your furniture and appliances, their design comes in at a close second. You could find yourself bored with how your house looks, however.
Changing things around sounds quite easy. It could be trickier than you’d think. Knowing how to rework your home’s style quickly and easily will overcome much of this. While there’s a wealth of things that you could do, a few come more than recommended.
Despite being relatively minor, they could make a significant impression on your home’s style.
Read more5 Tips to Help Transform Mommy & Daddy’s Bedroom into a Couple’s Retreat
The “oops I peed in mommy & daddy’s bed” potty training years are over! There are no more midnight feedings. No more spare diapers, wipes, and Butt Paste on the nightstand. No more rolling over in bed and popping open a Sippy cup lid filled with day old milk. No more stray Cheerios lingering between the sheets. No more co-sleeping, except for the occasional “I had a bad dream” or “scary thunderstorm” visitors in the middle of the night. And, truth-be-told, as a mom I actually found myself longing for a “scary thunderstorms” and/or a bad dream because in those moments I was able to reclaim a small morsel of the past. I thought I was suffering from a serve case of Post-Preschooler Depression. But what was actually happening was I didn’t reclaim my/our space as a couple, what is mommy & daddy’s room without the infant, toddler, preschooler necessities sprawled about? It was time to reclaim our space as a couple. Thus, when my husband went on a business trip for a week I seized the opportunity to take back our space and redecorated our bedroom as an early Anniversary gift for us. And it has been the BEST gift we have ever given ourselves! We now like to go to bed when the kids do, our bedroom has become our own little couple’s retreat, our little oasis. I highly recommend every couple do the same! Don’t know where to start? No worries, I got ya covered, love.
5 Tips to Help Transform Mommy & Daddy’s Bedroom into a Couple’s Retreat:
1. Inspiration– Don’t just hit up Home Goods and purchase the first comforter, drapes, etc. you see! Do a bit of research. This is often the step that takes the longest but most definitely should not be skipped! Determine what color, design style, and, possibly even designer, that inspires. My inspiration color was blue. I am literally obsessed with all things blue lately. To help you decide on a color I recommend you read up on the psychological effects of color (http://www.color-wheel-pro.com/color-meaning.html ). “Blue is the color of the sky and sea. It is often associated with depth and stability. It symbolizes trust, loyalty, wisdom, confidence, intelligence, faith, truth, and heaven. Blue is considered beneficial to the mind and body. It slows human metabolism and produces a calming effect” thus making it a great selection for a bedroom. Now that you know your color/colors it’s time to decide on a design style. Here is a site that does a great job defining the different styles, http://www.dwellcandy.com/interior-design-styles-2/. The design style I favor is Mid-Century Modern and I find myself really drawn to the designer, Johnathan Adler’s work. Here are a couple examples of his projects.
Once you have determined your colors and style it is time to move onto the next step.
2. List– This one is super simple but is the step most people forget, make a list of all the things that drive you insane about the current status of your bedroom. Then indicate how you can rectify said irritation.
My list included:
- Lack of privacy-need to get drapes
- Lighting is bad- need more light
- Comforter is torn (thanks to our puppy) – need a new comforter
- Only have one set of sheets-need a new set of sheets
- Can’t see entire outfit when getting ready- need a full-length mirror
- Husband comes in late and tosses clothes on floor- get chair to place clothes on
3. Shop– I like to peruse all my options first. Thus, I hit up Home Goods, Hobby Lobby, Kirkland’s, & JCPenney (all are within a 5 mile radius of one another in Toledo, score!) and each is within my budget constraints. What to look for: Look for items that not only represent the design style and color you wish to implement but also keep in mind the elements & principles of design. Elements of Design: point, line, shape, form, space, color, and texture. Design Principles: balance, proportion, perspective, emphasis, movement, pattern, repetition, rhythm, variety, harmony, and unity.
If you keep these in mind when shopping and purchasing items for your bedroom you will have a cohesive design. Note the textures in this image of our bedroom, the shag rug, plastic & woodgrain on the chair, reflective mirror, distressed/weather appearance on the frame of the mirror, each assist in providing a unified aesthetic appearance.
Also, note the patterns on the quilt and comforter, shapes and line of all the pillows, and the use of positive and negative space provides a visually appealing design. Also, I totally hit the jackpot, when I walked into JCPenney’s guess whose bedding line was there and on sale? Johnathan Adler’s!!! Lastly, note the undertone of the circle shape and the added texture found on the trim of the drapes and the lamp.
The key is to remember the elements and principles of design when shopping, don’t allow one to dominate your space, balance is key.
4. Assemble– Most items you purchase for a bedroom are straightforward. You know how to place sheets, comforter, pillow shams, etc. on a bed and how to assemble a light fixture (don’t forget the light bulbs), place a mirror, etc. But the HUGEST mistake people make is hanging drapery. Most people hang it too tight to the window frame and not high enough. Please, please take the time to hang drapery correctly; it is a matter of good vs bad design. Here is a great illustration of what to and not to do when hanging drapery.
5. Maintenance– Take a few moments to soak in the beauty, post a few pics to Instagram, etc. but don’t get too comfortable yet. The last step is just as important, and again, this step is one that individuals totally bypass while basking in the glory that is their new space. Maintenance is vital. How are you going to maintain this new, fresh, gorgeous space? And yes, dusting, vacuuming, and laundering are going to be important but in order to truly preserve the space rules and boundaries must be implemented.
Our rules for Mom & Dad’s Bedroom Retreat include:
- No fur-members allowed- I thought this one would be more difficult for me to uphold but I must be honest kicking the dog out of our room has led to many sleep filled nights and rest filled mornings. Also, I have found that I don’t have to vacuum/sweep or dust as frequently.
- No more watching Netflix in Mom & Dad’s bedroom- kiddos used to watch a show upstairs while we had “date night” downstairs, those days have passed.
- Ask permission before entering Mom & Dad’s Bedroom- this is something we are working on in general throughout the house. Knocking on doors and waiting for the person to answer, not entering someone’s room when they aren’t there, basically respect and privacy.
Disclaimer: There is a chance that you will adore your new kid-free oasis, couple retreat bedroom so much that you might find your family expanding by two tiny feet. Lol!
The Chore Charts of 2016, Baby!!
It has taken me a few weeks to admit this but I have fallen into a rut. I have become a bad influence on my children. I have become that mom I never wanted to become, the “I got it” mom, the mom who does it all…the laundry, vacuuming, cleaning the kitchen, bathroom, making beds, emptying trash, tidying, dusting, etc. Why? Well, quit honestly, because it is easier. It is far easier for me to do it all then to have to deal with bickering, complaining, redirecting, etc. Then it dawned on me the other day that I might be making things easier on myself and perhaps even my children in the short term but what about long term, what would the future hold? I suddenly foresaw college roommates who despised me, future son-in-laws who detested me, a future ex-daughter-in-law, and don’t even get me started on the repercussions my actions would have on my grand babies!! It’s time to MOM UP and delegate chores!!
First things first, I ditched the word chore, I can’t stand it! Just saying it out loud leaves me bitter. You add the word chore to any task, even getting a massage and it sounds like torture.
Second I removed any type of chart or time consuming device that helped keep track of children’s responsibilities, I know myself well enough to know what will work and what will not. I have been there and done the charts, graphs, magnets, etc. and sure they worked for a month or two but nothing worked for the long haul. Until now….welcome to the future of chore charts……
Mission Partition
(It rhymes, added bonus! I love rhyming words more than my preschooler, lol!)
I know it looks like an ordinary gallery wall displaying all that is near & dear to me, right!? But it also doubles as a location to place each child’s responsibilities for that week a.k.a. missions for the week. Kiddos preferred the term missions because it sounds cool…I believe the exact words my 10 year old stated were, “missions sound epic, I can say I have to go home and complete my missions before I can play!”.
Missions for the week are assigned on Monday mornings & should they choose to accept their daily missions in return they can have screen time. They are each also offered a challenge for the day and/or week. Should they choose to accept that challenge they have the potential to earn some money that week….up to $5 in one week if they complete ALL challenges everyday!
Missions include:
Set Dinner Table
Clear Dinner Table
Feed Dog
Clean up Dog Poop
Take out Recycling
Organize Shoe Rack
Match Socks
Take out Trash
Place dishes in Dishwasher
Dust Living Room
Clean Personal Space/Room
Clean Bathroom
Vacuum
Fold Laundry
Put Laundry Away
Need help determining what is an age appropriate mission? CLICK HERE
Challenges for the week are tasks specific to the season/event going on that week, etc. such as, help clear snow, rake leaves, weed garden, clean family room etc. Best Part about the Mission Partition, it saves me so much time, all I have to do is add the missions for the week with a dry erase marker and update challenges as need be, now that is my kinda “chore chart”!
Tips for creating a Gallery Wall:
- Decide on a color palette….don’t worry if you can’t find frames in the color you want, you can spray paint frames any color!! So hit up second hand shops for frames and give them a new updated look with spray paint.
- Have a variety of textures…..smooth, reflective, sequence, rough, etc. locate items around the house or purchase items that mean something to you, perhaps they remind you of vacation, a fond memory, etc.
- Have a variety of sizes/shapes….vary the shapes and sizes & balance each so that it is aesthetically pleasing to the eye, i.e. don’t place all the large items on one side together, vary them throughout the wall
- Asymmetrical….always hang an uneven number of items, 3, 5, 7, etc.
- Template the entire wall….purchase tracing paper & wall putty, trace each object (including where the item is to be hung with a little dot) and place on the wall. Play with the arrangement and live with the layout for a day or two…this is a step you should not rush!
- Once everything is arranged to your liking double check that everything is level and get out that drill, baby!! It is go time!
Our Happily Ever after Home
Huge thank you to Compass for inspiring me to write this post! Compass is a home search company that works mainly in Washington D.C. and New York City that helps pair people with neighborhoods and agents that best fit what they are looking for. They are running a series called Starter Stories so it inspired me to write this little gem.
It was 2004 and my husband and I had been searching for “the perfect” house for a year! And then one evening we met up with our extremely patient realtor and toured the house that would become the location and setting for our happily ever after. There was something familiar, comforting, something that said welcome home. It reminded me of the house I used to draw in pictures when I was a child. The only thing missing was the white picket fence.
The house had almost all my ‘must haves’ …the kitchen wasn’t the best but we would change that…and most importantly the location was unbeatable! It was close to interstates, church, the mall (hehe), school, we could walk to two bowling alleys, health food store, bars, park, etc. It was perfect!!
We took possession and within 9 months we pulled up carpeting, finished the hardwood floors, pulled off wallpaper, painted, carpeted, purchased dishwasher, garbage disposal, and had SO MANY more plans, like gutting the kitchen, and then in November 2005 we welcomed our first child. Talk about a transformation!! We left our house for the hospital and 2 days later we officially came HOME with our baby girl. Though the house didn’t structurally change it felt so different having a baby in it.
We enjoyed our little family, 2 adults, baby, cat, & dog but something was missing. We welcomed another addition in 2007, our son. And again the house didn’t change at all but it felt so different walking into our home as a family of 4. I would love to say we did a lot to the house but we were just so busy maintaining what we had already accomplished. We were scrubbing crayon off walls, trying to get scratches out of the hardwood, play-doh out of the carpeting, there was over a 1000 spills, and a couple crashes (those little boys, I tell ya, ha-ha! Our son earned the nickname Office Max after receiving staples & glue due to goofing off on the stairs & trying to fly). And just when we started to calm the chaos and contemplated gutting the kitchen (we even had a new kitchen layout printed and in our hands!) we found out we were expecting again!!
And I tell you what; this time was the most magical homecoming! I was home with the new baby and my husband went to get our older two kiddos from my parents. We decided we wanted to be surprised and didn’t find out the sex of the baby when I was pregnant. And since I was in and out of the hospital, (within 25 hours) the kiddos didn’t come up to see their new sibling, so they were going to be surprised big time! I can remember it like it was yesterday. I was sitting on the steps with the baby, 3rd step from the living room floor to be exact. My husband opened the front door, kiddos walked in, and rushed over to me. Each eager to see if they had a sister or a brother! And then I pulled back the blanket to reveal the pink outfit, they had a baby sister!!
Four years later and we still haven’t gutted the kitchen, truth be told we really haven’t touched the kitchen. Minus our new puppy ripping up the floor. Haha! We did remove the pantry door a while back and am pleased with the outcome.
So maybe I don’t have granite countertops or glass tile backsplash but I do have the 3rd step, and strangely that means more to me. You see years from now when we no longer live here the kitchen will be gutted; perhaps a half dozen times but that 3rd step, that step isn’t going anywhere! And besides I was much busier working on this masterpiece….this is my favorite part of my kitchen!
Repurpose your Furniture, Repurpose your Life
“I’m trapped!!” the classic comment from family, friends, and guests when they dine at our home…talk about embarrassing! But it was the truth. Our dining room was a hot mess! A hot mess that always had us playing a form of dining room twister in order to pass food, water, etc. around the table. And God forbid a child or elderly should need assistance on the other side of the table…the most efficient way to get to them would be to literally climb over the table. And etiquette tells me this is highly frowned upon table manners…but what’s a host to do?
It all started 9 years ago when we moved into our home. We were moving from a town house. The town house had a very large master bedroom that comfortably allowed for a king size sleigh bed, chest, nightstand, and long gorgeous dresser with framed mirror. It was beautiful! Problem was we were now moving into a home that was built in the 1940s and apparently people back then were clearly not the consumers that we are today! The closet space was minimal, the bed barely fit, and we managed to squeeze the chest and nightstand, but there was no way my gorgeous dresser would ever fit. So guess where it went? The dining room!
The dresser surprisingly looked nice in the space, like a beautiful buffet and it gave the dining room a more formal touch. So I decided to add to the formality of the space and transform a book shelf into a hutch…well almost entirely, I never added doors to the bottom. But I did add a place to hang wine glasses and added all our formal dining dishes to the shelves. It worked, in fact the two pieces of furniture coordinated nicely. The problem only began once we actually used the space. See, in addition to the dresser and book shelf there was also the dining room table, chairs, and bench…now that’s a lot for a 1940s sized dining room.
The first few times we entertained in the space I just thought of it as cozy. Mind you we only had a child and perhaps an additional couple or two dining with us. Fast forward to today and we have three children and our gatherings often include a minimal of 8 additional people. Thus that cozy quaint space went straight to crowded and guest claiming “I’m trapped!” It got to the point that when we would host Thanksgiving and Easter for our extended families my husband and I would literally move all the living room furniture into the dining room and dining room into the living room so that our guest could comfortable breath move.
To be entirely honest there were a few months…going on years… where the dining room was simply that room where we would walk through on our way to the kitchen and store an occasional item on the table (note the ironing board and bags in the image above…and yes, ceramic Easter items still on the shelf long after Easter, ha-ha). Then I had an epiphany! What if…now what I am about to say might blow your mind so you might want to sit down if you aren’t already…we get rid of some furniture. Crazy right!? I finally came to terms with the fact that while having (semi) formal dining room furniture was appealing it simply wasn’t practical for our space or our life. I had to let go of the dream of having all the furniture in order to reclaim the space.
So I removed the hutch from the dining room and managed to find a new home for the dishes…funny thing is, we have yet to even use half of those fancy dishes…(for some reason shrimp cocktail, fancy cheese, and whatever else you are supposed to serve in the crystal aren’t a regular when we entertain families with young kiddos, lol!) I found a new location for the hutch in the kitchen. We had a space that wasn’t being utilized to its full potential. The furniture piece that was there was too deep for the space, and was basically the catch-all for random items so it was bursting with stuff. And the wall space above wasn’t even being utilized. Oh, and do you see all the shoes? This area was screaming reorganize me! And I did!
Being a Mom on the go with three kiddos I have always wanted a mud room. A place when the children could hang coats, umbrellas, book bags, place boots, shoes, and sports equipment. But given the size of our home and the constraints of our budget I figured it was an impractical request. But what I found was, if I reconfigure the furniture I can actually make a mud room (or at least the start of a mud room)…
What was once a mere display unit where guest could see all our pretty dishes that never got used is now a practical piece of furniture that stores my cookbooks, children’s homeschooling workbooks, play dough fun, shoes, keys, glasses, sports equipment, and more!
And guess what? We can now comfortably sit around the dining room table. Fancy that! I repurposed one piece of furniture and what we received in return was a way to repurpose our life that involves more structure and we can entertain in the dining room again!
So what do you think? Do you have a space in your home that is cramped? Have you ever had to move furniture around in order to accommodate your guests? Do you display dishes in a hutch? Do you ever use those dishes? Or are you like me and you never touch them except when you have to dust, lol?
Like the featured image with the clawfoot tub as a couch? Then click here for some more fun creative ways to repurpose furniture.